For other Silver Glass 101 entries, look for *Silver glass 101* under *Labels* on the side bar!
The Striking Sequence
Step 1
Work in neutral flame. Heat until translucent – the glass is almost droopy at this point and the surface of the bead actually gets hazy. (see end of this post for an example)
Step 2
Let cool until the glow is gone (do the under the table test), marvering helps cool the glass faster, thus sometimes yielding more colors.
Step 3
Slowly reheat at the tip of the flame. Once warm, bring the bead forward til it starts to glow orange.
Step 4
Observe this first strike as dark tones bloom (dark brown or purple). Note: if not, you didn’t heat it hot enough so start with step 1 again. You must have dark tones in order to achieve striking colors.
Step 5
Experiment with length of the striking time for different effects.
Step 6
And/or repeat the striking sequence to achieve different results – do NOT heat the glass molten from this point on or it will start the first strike dark tones again.
Experiment!
Depending on how much you heat and how much you cool, as well as where you heat in the flame and which part of the bead you heat, you will get different range of colors. By varying the combinations of how you shape the bead, how many times you strike the glass and at what intensity you strike the glass, you will get different results.
Note: If you over strike the glass and it turns just yucky creamy, start all over again. Most striking glass allows you to re-strike repeatedly.
---------------------------------
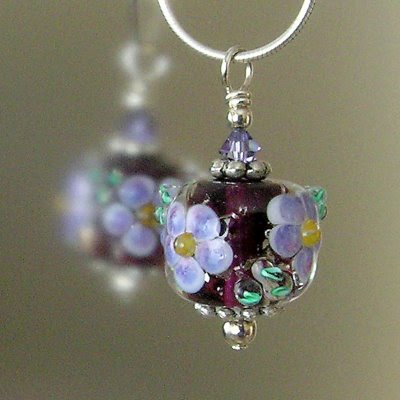
It’s very difficult to photograph the “heat until translucent” stage on a spacer bead. This image shows what we mean by “the glass is almost droopy” under Step 1. Take during the photography session Stephanie Bonniwell and I did for our Double Helix Luna 2 Tutorial for The Flow Magazine.
© enVision 2009
Tuesday, March 31, 2009
Silver Glass 101 – Reducing Silver Glass Basic
I have been trying to answer as many questions regarding silver glass on forums as I can and realize that I should probably have all that information in one location for easy access. . . thus Silver Glass 101 is created. This is the first of many postings on how to work with silver glass, tutorials, annealing, etc. etc. Hope you find it helpful!
The Reducing Sequence
Step 1
Work in a neutral flame. Once you have shaped your bead, let it cool until the glow is gone (do the under the table test), marvering helps cool the glass faster.
Step 2
Create a reduction flame by reducing the oxygen, increasing the propane, or both. Depending on the silver glass used, your yellow candles vary from 1" (very slight reduction) to 3".
Step 3
Gently reheat in the reduction flame. The placement of the bead varies from just outside the tip of the yellow candles to 6-7" from the face of your torch. Different methods may be used: bounce the bead in and out of the flame or rotate the bead directly in the flame.
Step 4
Take the bead out of the flame and see the iridescence develop.
Step 5
Experiment with the length of the reduction time and/or repeating the steps 1 to 4 to create different effects.
Step 6
An oxydizing flame can be used to “erase” some of the reduction effects.
Experiment!
• using lighter and heavier reduction (so the yellow candles are shorter or longer)
• putting the bead closer, or further away, in the flame
• putting it in the flame less or more, as in quick flash or longer swirl
• reducing multiple times (as well as varying which part of the bead you reduce)
• alternating it between reduction and oxydizing flame
Note: Some glass allows you to “erase” ALL the reduction in an oxydizing flame and start all over while others will not.
© enVision 2009
Labels:
reducing silver glass,
Silver glass 101,
Tutorial
Changing the Width of Your Blog Page
I find that the blogspot template at 660px wide is too narrow for some of my needs. Yet the "stretch" version is too wide especially making reading the text difficult. So I customized it!
Here are a few easy steps if you want to change yours too! Don't worry, as long as you know which template you have been using, you can always go back to that template (under Layout > Pick a New Template tab) and everything will go back to the way it was!
Step 1
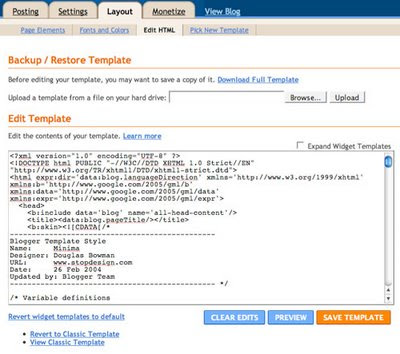
You need to be in your Layout > Edit html tab:
Step 2
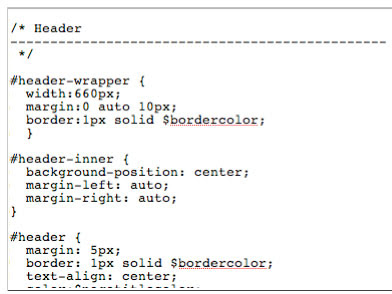
Scroll down until you see the Header html code, it's currently at 660px:
Step 3
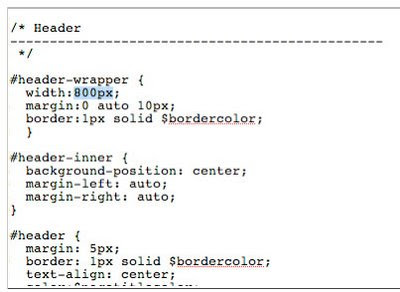
Change it to 800px:
Step 4
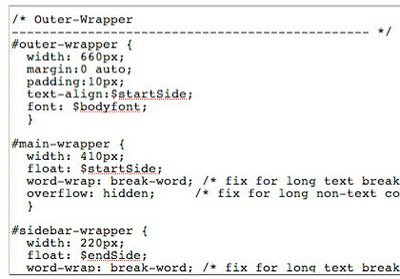
Scroll down to Outer Wrapper code:
Step 5
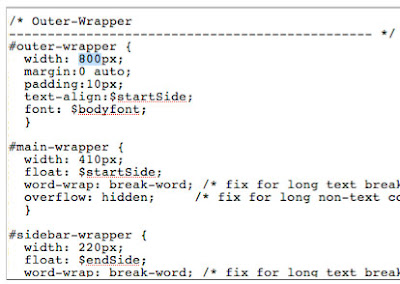
Change that to 800px as well:
Step 6
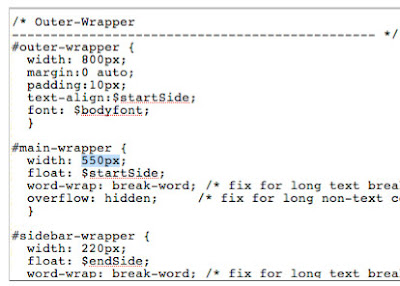
Change Main Wrapper to 550px (this is the column width of you main post entry):
Step 7
Finally, don't forget to click "Save Template"
If you have modified your font and colors, you will have to do that again. Sorry!
------------------------------------------------------
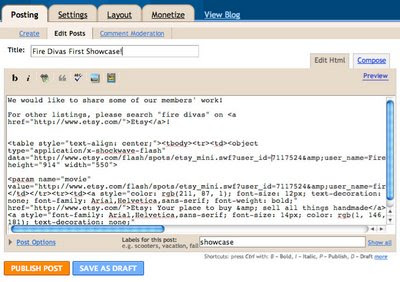
The following is for my fellow Fire Divas! Go to the Posting > Create (or Edit Posts if you have already posted) > Edit Html tab
Copy and paste the html code and you will have our Etsy Mini up in gallery mode!
Monday, March 23, 2009
Arrow Springs Explore the Magic of Silver Glass Workshop
Perhaps some of you would like to join us for a weekend of fun!?!
Explore the Magic of Silver Glass with Hayley
In this two-day workshop, you will explore the many facets of working with silver glass. For reducing silver glass you will learn how to work with different reduction flames, varying length of reducing time, and changing placements and positions of the bead in the flame, to achieve various results. For striking silver glass you will learn how to achieve and recognize the "first strike," thus enabling you to duplicate the striking sequence on your own.
Once the basic technique of working with silver glass is achieved, you will learn the different ways of using silver glass to expand your repertoire. Some of the techniques we will cover include encasing silver glass, surface decoration with silver glass – stringers, shards and twisties, and using silver glass in gravity swirls. In addition to how to achieve the best results with this mysterious glass, special emphasis will be placed on design and perfect bead shaping. With the exception of the initial instruction on how to strike and reduce spacer beads, you will be making large bicone/tubular shaped beads.
Students should be at an intermediate skill level and comfortable working on a propane/oxygen mix torch.
See Hayley's website.
Two day class. Class hours are 9 to 5, lunch included.
Cost is $425 and includes all materials.
Dates:
December 5 & 6, 2009
Tuesday, March 10, 2009
Photoshop Workshop!!!
Some of you know that graphic design is my day job and I have been using Photoshop since shortly after its inception in the late 1980's (now I am showing my age!). About a month ago, I gave a short private lesson to a friend and decided that I should really be teaching a Photoshop Workshop custom tailored for beadmakers and jewelry artists! I love to teach (watch for my upcoming silver glass workshop at Arrow Springs in December!) so here I am, offering a two-day workshop for Photoshop, including some photography.
Student may attend one or two days, but only those who sign up for both days will have priority. If you sign up for only one day, you will be put on a wait list to obtain a spot should the class doesn't fill up with two-day students. Having said that, if enough of you are interested in only a one-day class, I will be happy to arrange for another workshop.
This will be a hands-on class with two students sharing a computer, eight maximum.
Labels:
hands-on class,
photography,
photoshop,
photoshop workshop,
workshop
Photoshop Workshop – The Details
Requirements
Prior experience with computer programs is highly recommended - essentially you should know more than just getting on the web and reading your email. This is a fast-pace workshop and I'd hate to have you not being able to keep up! It's also important that you have or plan on purchasing Photoshop or Photoshop Elements. If you have a laptop and prefer to use your own program, feel free to bring it. You will be working on a Macintosh computer - if you are on a PC, the only difference is your Alt is our Command key. Photoshop is almost identical on both platforms.
Cost
$125 for Day One
$200 for both days
Dates
Saturday 25 April and Saturday 2 May, 9am to 5pm with an hour for lunch
The reason for picking two Saturdays is that you will have time between the two classes to practice at home and attend the second day with questions. I also feel that you will digest the information better this way.
Agenda
Day One Morning
• You are to bring a photograph of your bead/jewelry, your camera, as well as the bead/jewelry itself, preferably the same one.
• I will demonstrate the steps on how to process an image on Photoshop - sharpening, color correcting so the image matches the piece, cropping and sizing for various usages including web, saving, archiving, retouching, etc.
• You will do these steps with your computer partner on the image you brought
Day One Afternoon
• I will work with each of you and photograph the same bead/jewelry with YOUR camera on my photo setup, we will discuss about photography setup as well
• You will process the new image in Photoshop
• You will go home with a CD of your images
Day Two Morning
This is a working day for questions and I will help each of you to trouble shoot any issues you might have at home after Day One. You may bring other beads/jewelry to photograph and work through the process again.
Day Two Afternoon
For those of you who are ready to go on to some of the more advance functions, I will demo more techniques in the afternoon.
Examples
Attached are two images - first one was the image my friend took on her own before our lesson, the second one was what she ended up with after she photographed with her own point-and-shoot camera and processed the image in Photoshop. (Note: she didn't bring the pendant from the first image.)
BEFORE
AFTER
Labels:
hands-on class,
photography,
photoshop,
photoshop workshop,
workshop
Metal Clay
We are lucky to have been taking a series of workshop with Hadar Jacobson! For those of you who are not familiar with her work, she is truly an amazing artist. Her website, artinsilver, is like an online museum! In addition, she has developed a line of metal clay - bronze and copper - that has superb workability. The best part is that you do NOT have to keep the clay cold! It comes in powder form thus has an unlimited shelf life. Mixing is easy peasy. You can find information, including a video on how to mix the powder, at her online store, as well as her blog.
We have been busy playing with rocks! Here is a pile (with a pillow and lentil beads) - they all still need to be fired except for one.
Labels:
bronze,
bronze clay,
copper,
copper clay,
hadar,
metal clay,
rocks
Friday, March 6, 2009
Peacock
One of the many reasons I love using silver glass in almost all of my work is because of its unpredictability! The surprise element is what draws me to keep torturing myself time and time with results that don't often meet expectations. Then once in a blue moon (when all the stars are aligned perfectly, I suppose!), something magical happens. This is truly one of those times. When I took this bead out of the kiln, I was speechless (for those who know me well can attest that it's no simple feat - to make me speechless, that is! lol!)!!!
I am still debating if I should list this on one of our stores or keep it for my private collection!
Labels:
Silver glass,
striking silver glass,
StrikingColor,
Twisties
Wednesday, March 4, 2009
SE3 Printed Booklet Available at lulu.com!
We realize that some of you do not own a good-quality inkjet color printer so we ordered a sample booklet from lulu.com to check its quality. We find it meets our high standards, thus enabling us to offer you this in hard copy printed booklet form!
For $43.90 plus shipping, you don't have to purchase the high-res CD and take it to your neighborhood service bureau yourself!
http://www.lulu.com/content/paperback_book/se3/6206163
If you are interested in SE2 in printed booklet form, please contact us:
http://envisionsf.com/contact.html
For $43.90 plus shipping, you don't have to purchase the high-res CD and take it to your neighborhood service bureau yourself!
http://www.lulu.com/content/paperback_book/se3/6206163
If you are interested in SE2 in printed booklet form, please contact us:
http://envisionsf.com/contact.html
Labels:
Double Helix,
e-Booklet,
Precision 104,
SE3,
Silver glass,
StrikingColor,
TAG 104,
Tutorial
Subscribe to:
Posts (Atom)